Instantiate a Draft
Now that we have a valid description of a signing process, we would probably like to actually execute it. Because our draft currently only contains the abstract description of a flow process, we will need to provide concrete documents and users.
In future, the Flow API will handle the creation of documents for you. However, during this highly experimental, rapidly evolving period in the project's history, you will have to set these up manually. It is also necessary to make sure their signatories and document settings are synced up with what is described in the flow process.
We're sorry about this. We're working on it. Expect this to change (along with many other things about the way Flow Processes are described, configured and executed).
Setting up the document
First we need to set up a document and save it as a draft. I'm going to do this via the web interface for simplicity. You will likely do this via the Document API in a real integration.
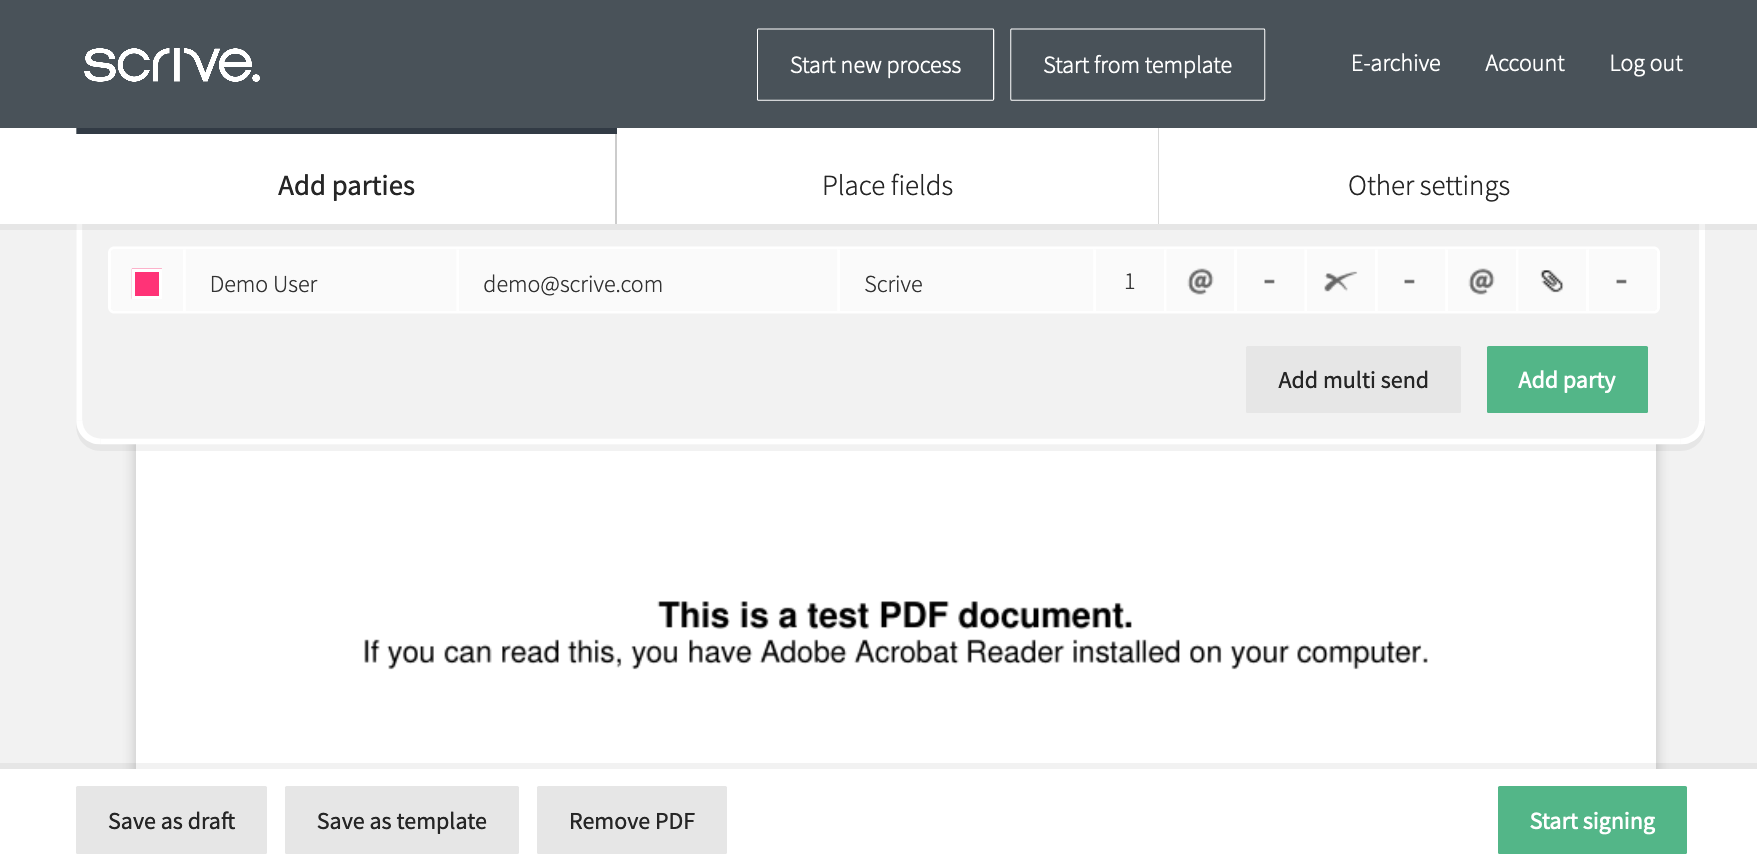
It's important here to ensure that the document is saved as a draft. It's also important that is has the same number of signatories as the flow process, and that the configuration for each does not conflict with the flow process.
In this example, our process has only one document signatory, so the document must also have one signatory.
We must also make a note of the document's ID. If we were using the Document API, this would in the JSON response. Given that we're using the web interface, we can get it from the URL:
https://scrive.com/d/9179748218119364628#participants
This means that our document ID is 9179748218119364628. Keep yours to hand for the next step.
Instantiating the flow draft with our document draft
Next, we need to start a new flow instance from the process description stored in our flow draft, using our document draft.
An instance is our terminology for a running flow. This is a signing process, as described in our process DSL, which is currently being executed. Instances are currently started from Drafts.
Providing the process parameters
Firstly, we need to create a JSON request body that we'll use to instantiate the draft:
{
  "process_parameters": {
    "documents": {
      "doc1": "9179748218119364628"
    },
    "users": {
      "user1": {
        "id_type": "email",
        "id": "demo@scrive.com"
      }
    },
    "messages": {}
  }
}
Place the above JSON in a file called params.json.
In this object, we give values to the two variables in the process DSL, namely user1 and doc1.
We must account for all variables used within the process DSL, and they must match the values in the document draft.
Making the request
We will assume you have constructed the auth header as demonstrated earlier in this guide.
First we need to specify the draft which was created beforehand. In our case this was 8ebb15ef-5aed-46d3-a978-bb616e2be919:
$ draft_id="8ebb15ef-5aed-46d3-a978-bb616e2be919"
Make sure that you are currently in the same directory as params.json and execute the following:
$ curl -X POST -H "${auth_header}" -H 'content-type: application/json' \
  "https://scrive.com/experimental/flow/drafts/${draft_id}/start" \
  -d @params.json
As you can see, the draft_id which we'd like to start the instance from is specified in the URL. We also provide the parameters in our params.json file, which will be sent as the request body, to fill out the variables in the draft.
Successful instance start response
If you did everything above correctly, you will see something very similar to the example below:
HTTP/2 201 Created
server: nginx
date: Wed, 22 Mar 2021 14:56:33 GMT
content-type: application/json
strict-transport-security: max-age=31536000

{
  "id": "e7a59059-af60-4c6e-9920-bf5ecb4345a7",
  "title": "Simple Flow",
  "process": {
    "dsl-version": "0.2.0",
    "stages": [
      {
        "initial": {
          "actions": [],
          "expect": {
            "signed-by": {
              "users": [
                "user1"
              ],
              "documents": [
                "doc1"
              ]
            }
          }
        }
      }
    ]
  },
  "process_parameters": {
    "documents": {
      "doc1": "9179748218119364628"
    },
    "users": {
      "user1": {
        "id_type": "email",
        "id": "demo@scrive.com",
        "auth_to_view": null,
        "auth_to_view_archived": null
      }
    },
    "messages": {}
  },
  "state": {
    "available_actions": []
  },
  "access_links": {
    "user1": "https://scrive.com/experimental/flow/overview/258b6c7a-73fb-44bf-bc33-bcf4c515f1eb/user1/1db5747a53d928e6"
  },
  "status": "in_progress",
  "started": "2021-03-22T14:56:33.699368Z",
  "last_event": "2021-03-22T14:56:33.699368Z",
  "callback": null,
  "author_id": "9206820953483512465",
  "folder_id": "18805"
}
Note that the instance's status is in_progress and the instance has a different id from its draft.
Drafts are destroyed by the act of starting them. If you try to access the draft via its id using the draft API, you will receive a 404 Draft not found HTTP error. The started instance supersedes the draft.
If you would like to know in greater detail what the various fields in this response are for, then you can read our explanation article on instances.
Interacting with the instance as a participant
Now that have a fully functional, running instance. It's time to start using it. In our simple workflow, we chose not to have the Scrive system send out notifications to the participants. Instead we're going to take the access link directly from the JSON response above.
Accessing the overview page
user1's access link is listed above as:
https://scrive.com/experimental/flow/overview/258b6c7a-73fb-44bf-bc33-bcf4c515f1eb/user1/1db5747a53d928e6
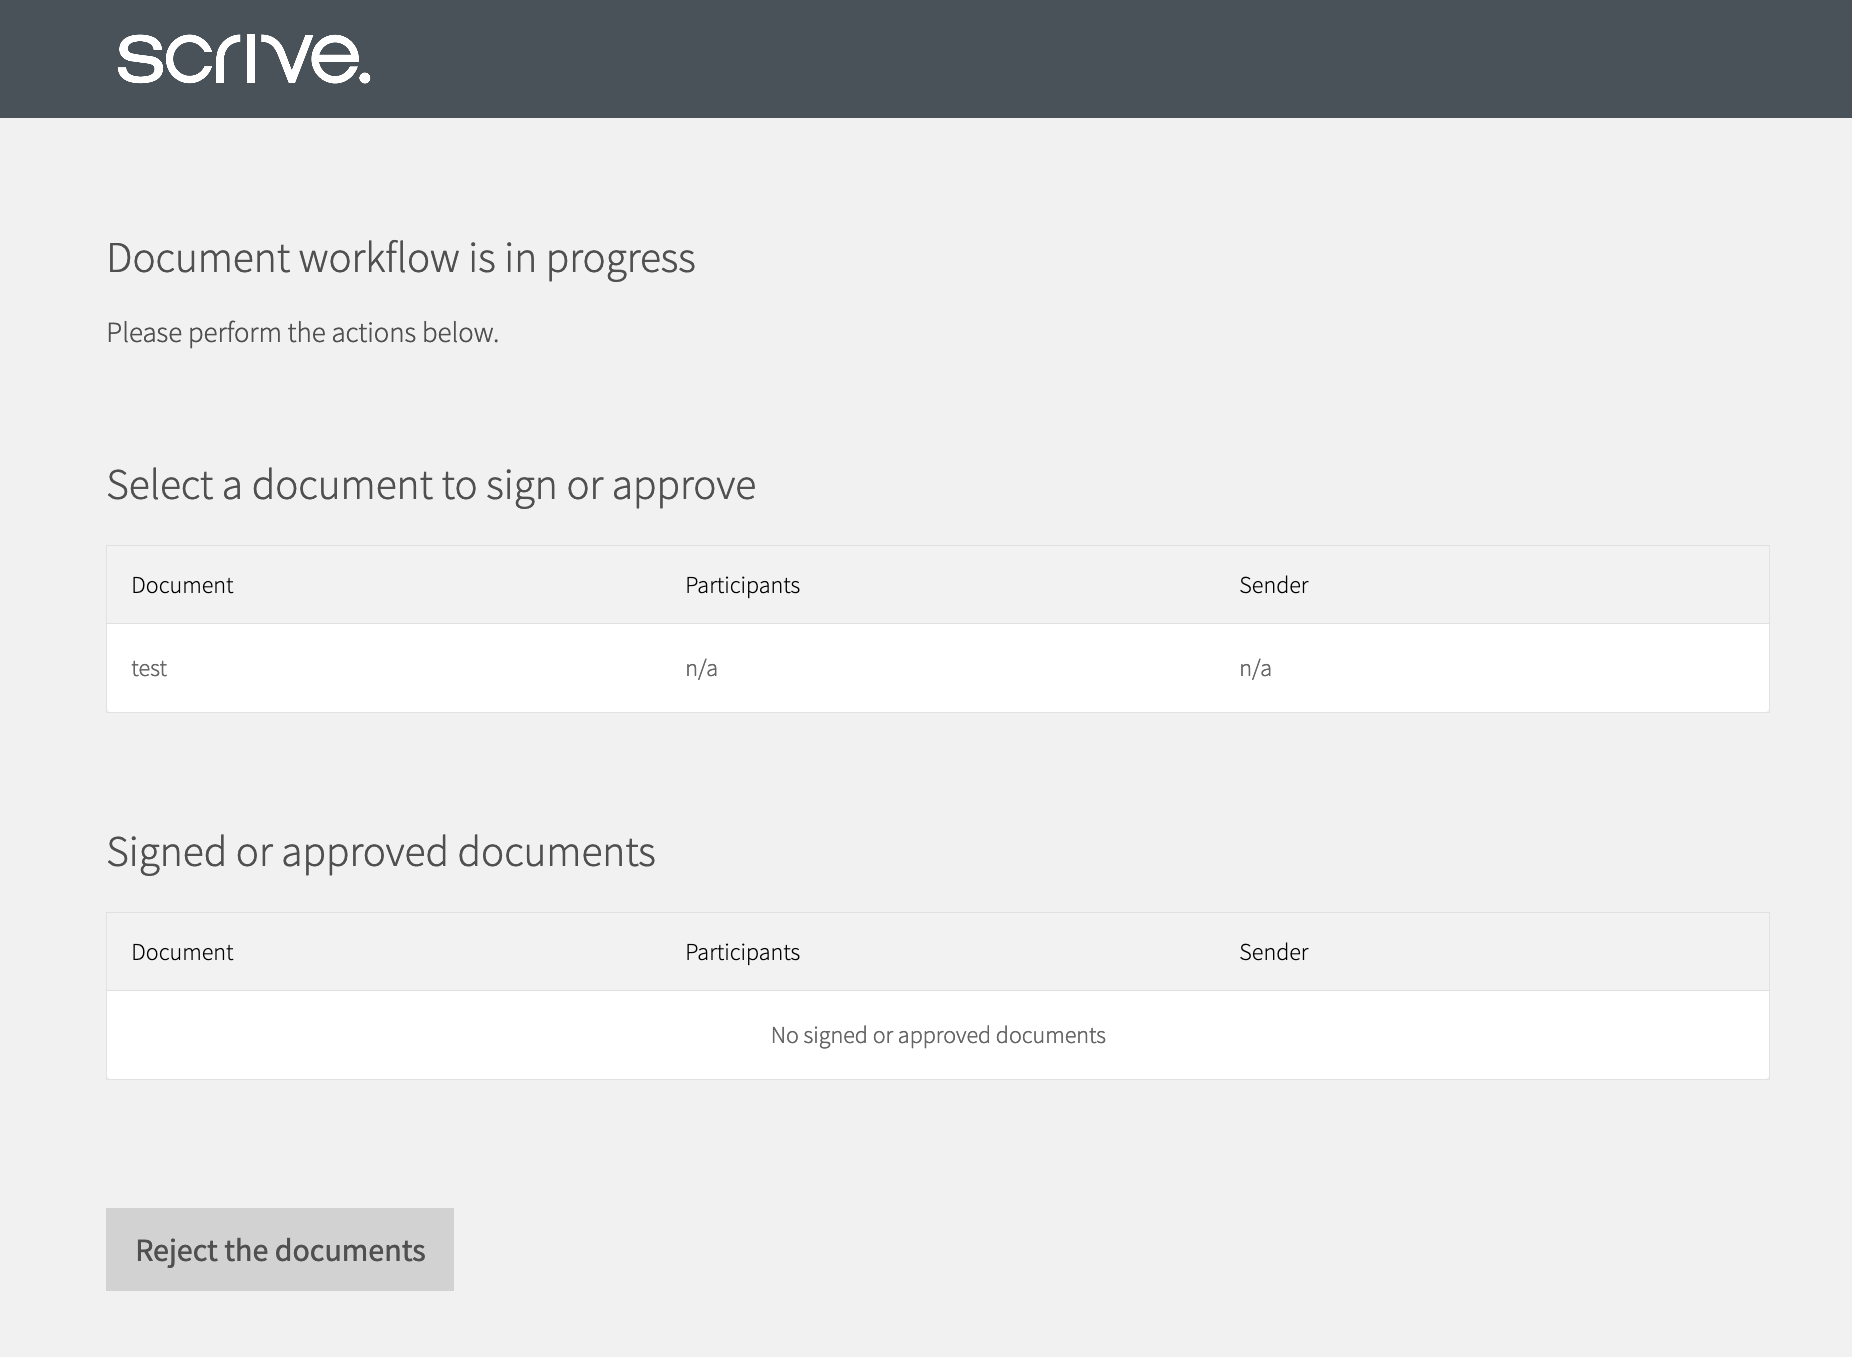
This access link is a form of authentication for the invited user. By visiting this link, they will be provided with a cookie which marks them as a given participant. They are then forwarded to the overview page, which will look something like this:
Let's play the role of user1, please follow the access link to the overview page for user1.
There are three sections of note here:
Pending actions
The header "Select a document to sign or approve" shows a list of actions that you can currently perform at this stage in the instance's execution.
Completed actions
The header "Signed or approved documents" displays a list of documents which have already been dealt with to the maximum extent at this stage in the instance's execution.
Reject the documents
This will allow you to reject the flow as a whole. This means "I refuse to sign or perform any of the actions requested of me". This will reject all remaining documents and send the instance into a failed state.
If you reject an individual document within the flow, this will also, currently, trigger a general rejection of the entire flow.
Signing the document
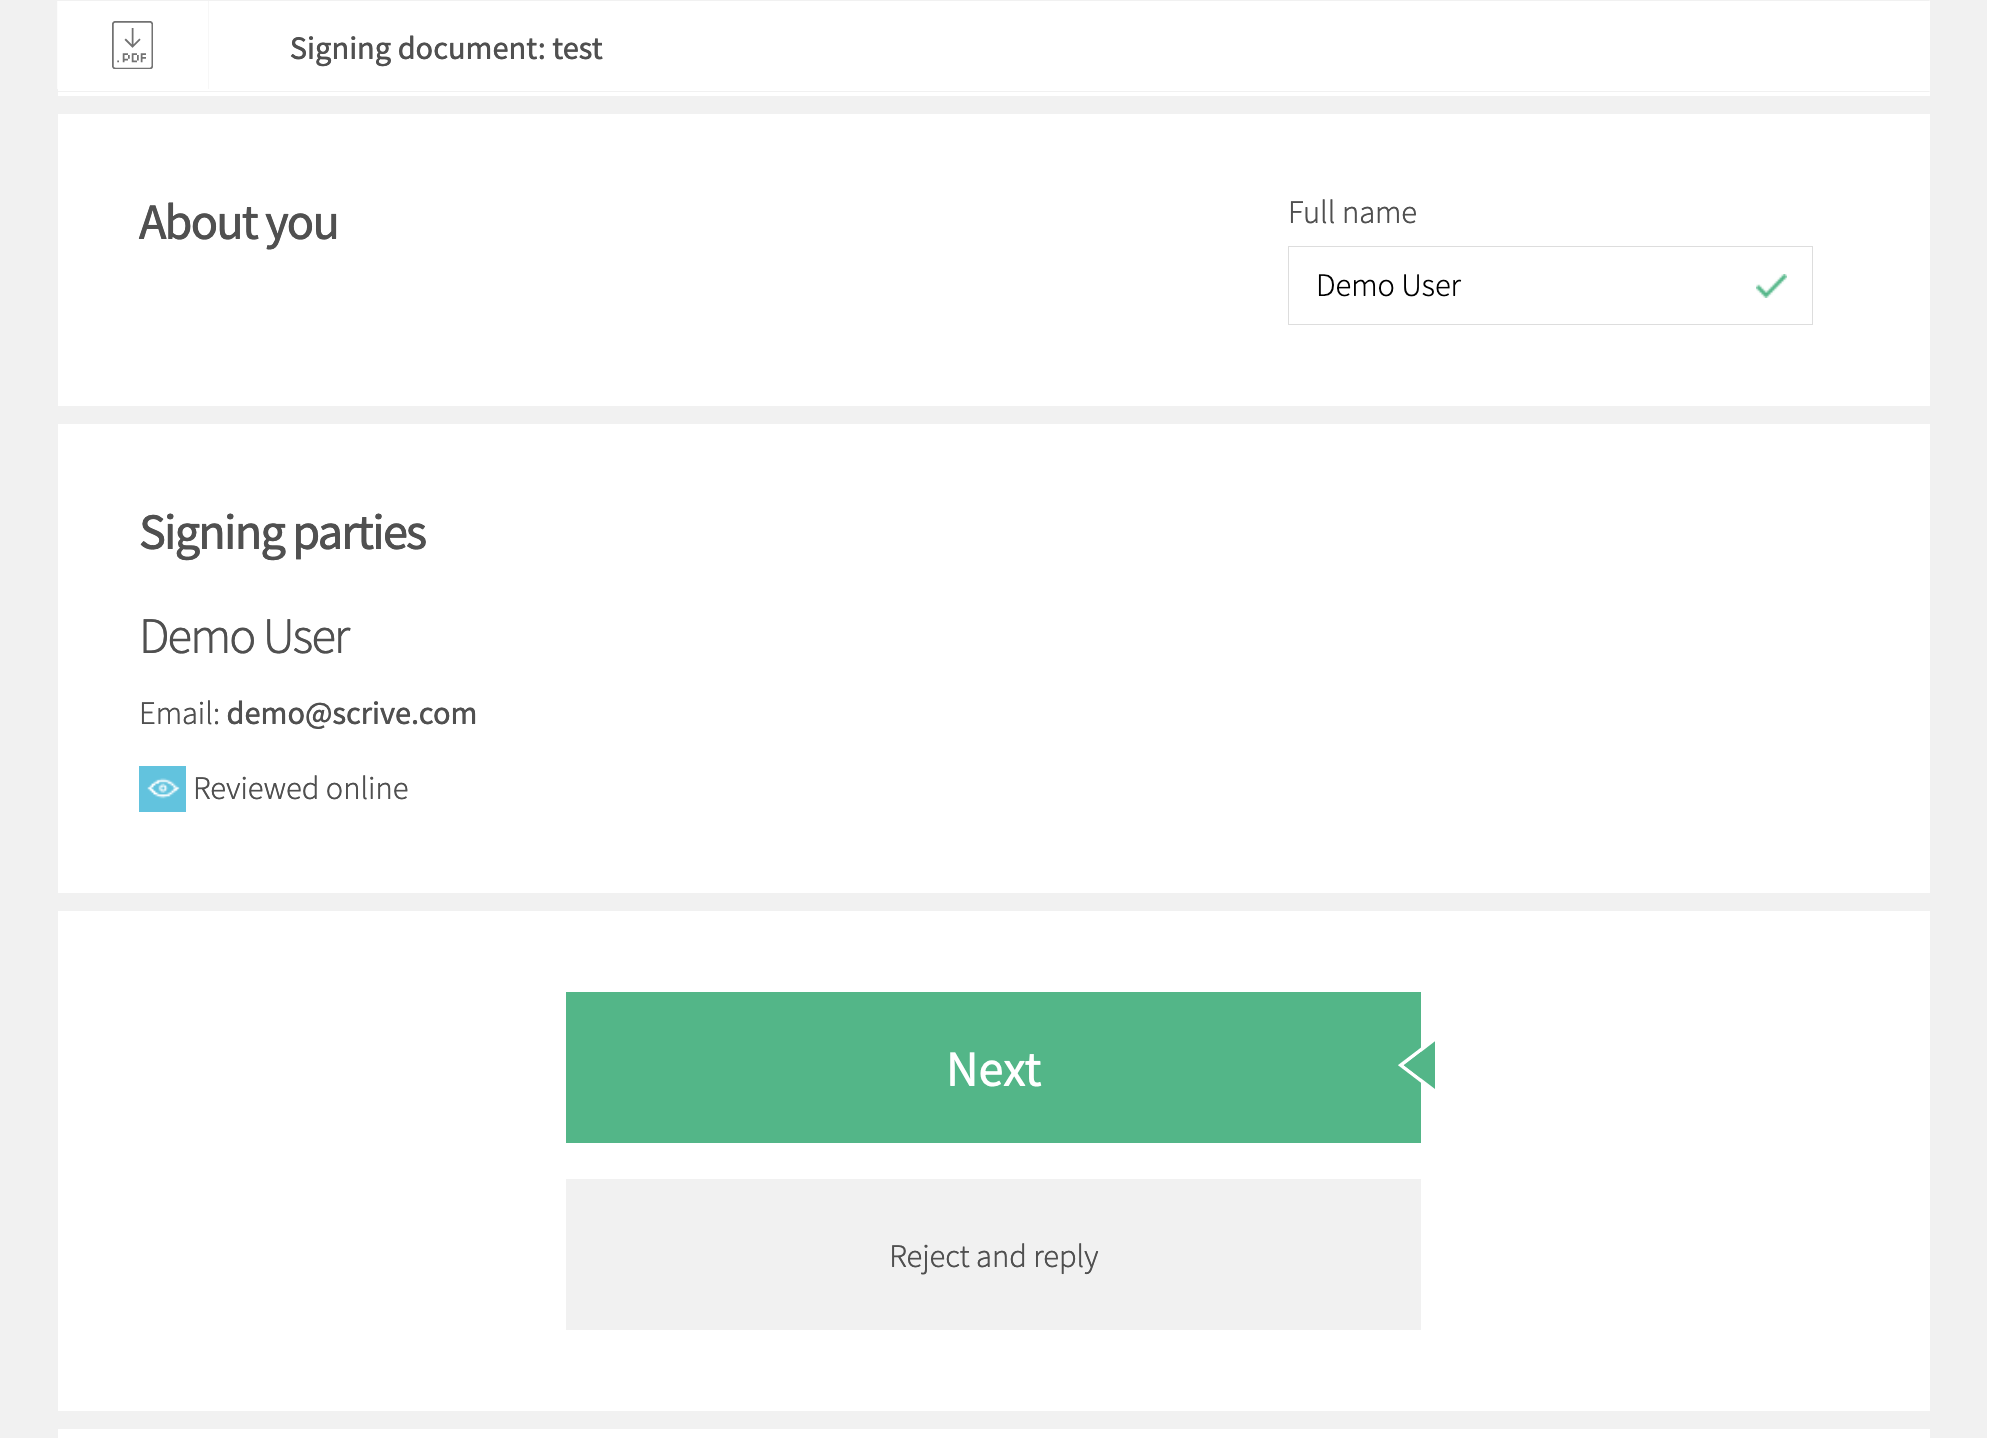
Now that we're here on the overview page, we should follow the link to the singular document that composes our e-signing workflow and sign it by scrolling down, filling in your name, and clicking "Next":
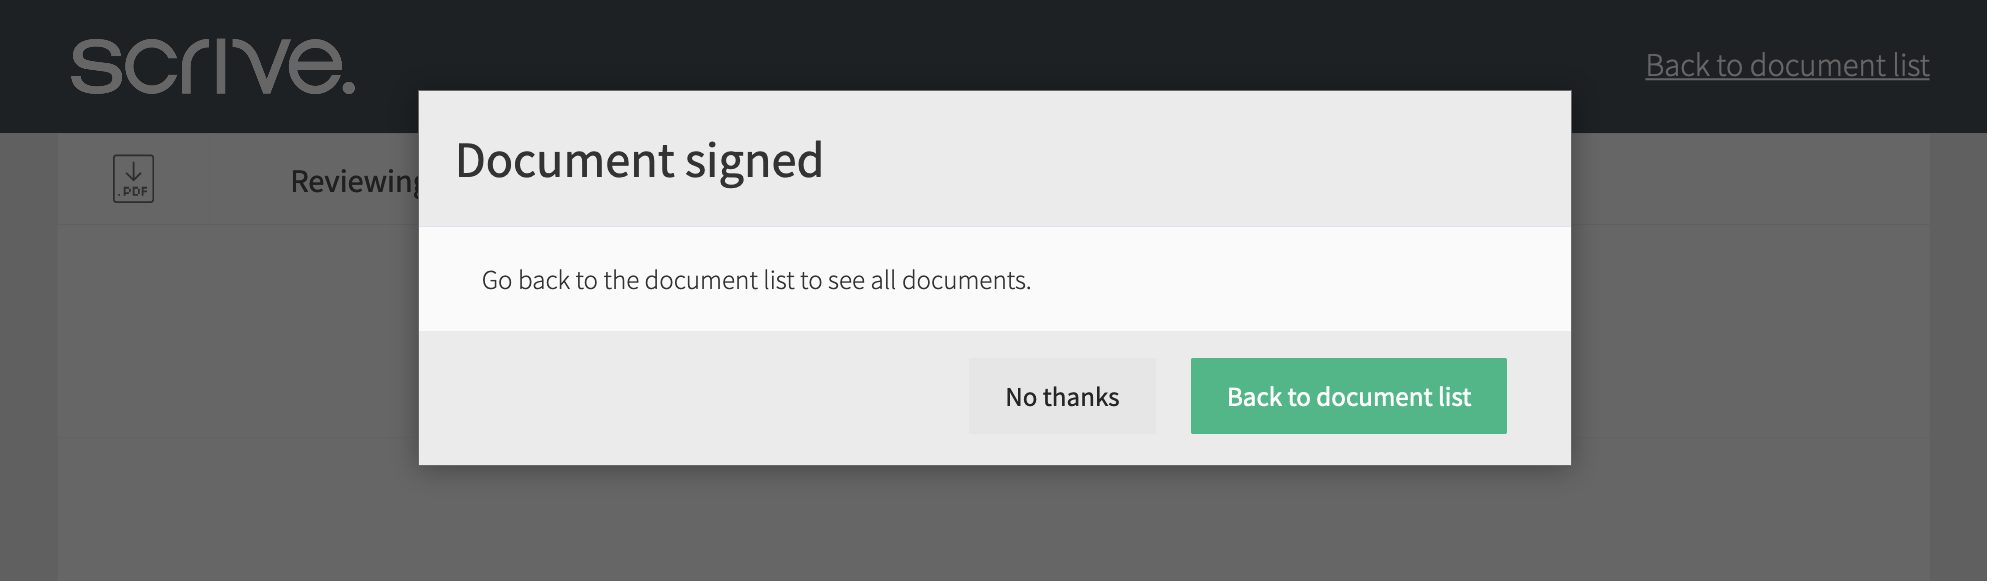
Now that we have signed the document, we'll be offered the chance to remain on the document, or return to the instance's overview page for user1:
Let's go back to the overview page.
As you can see, we now no longer have anything in the pending actions:
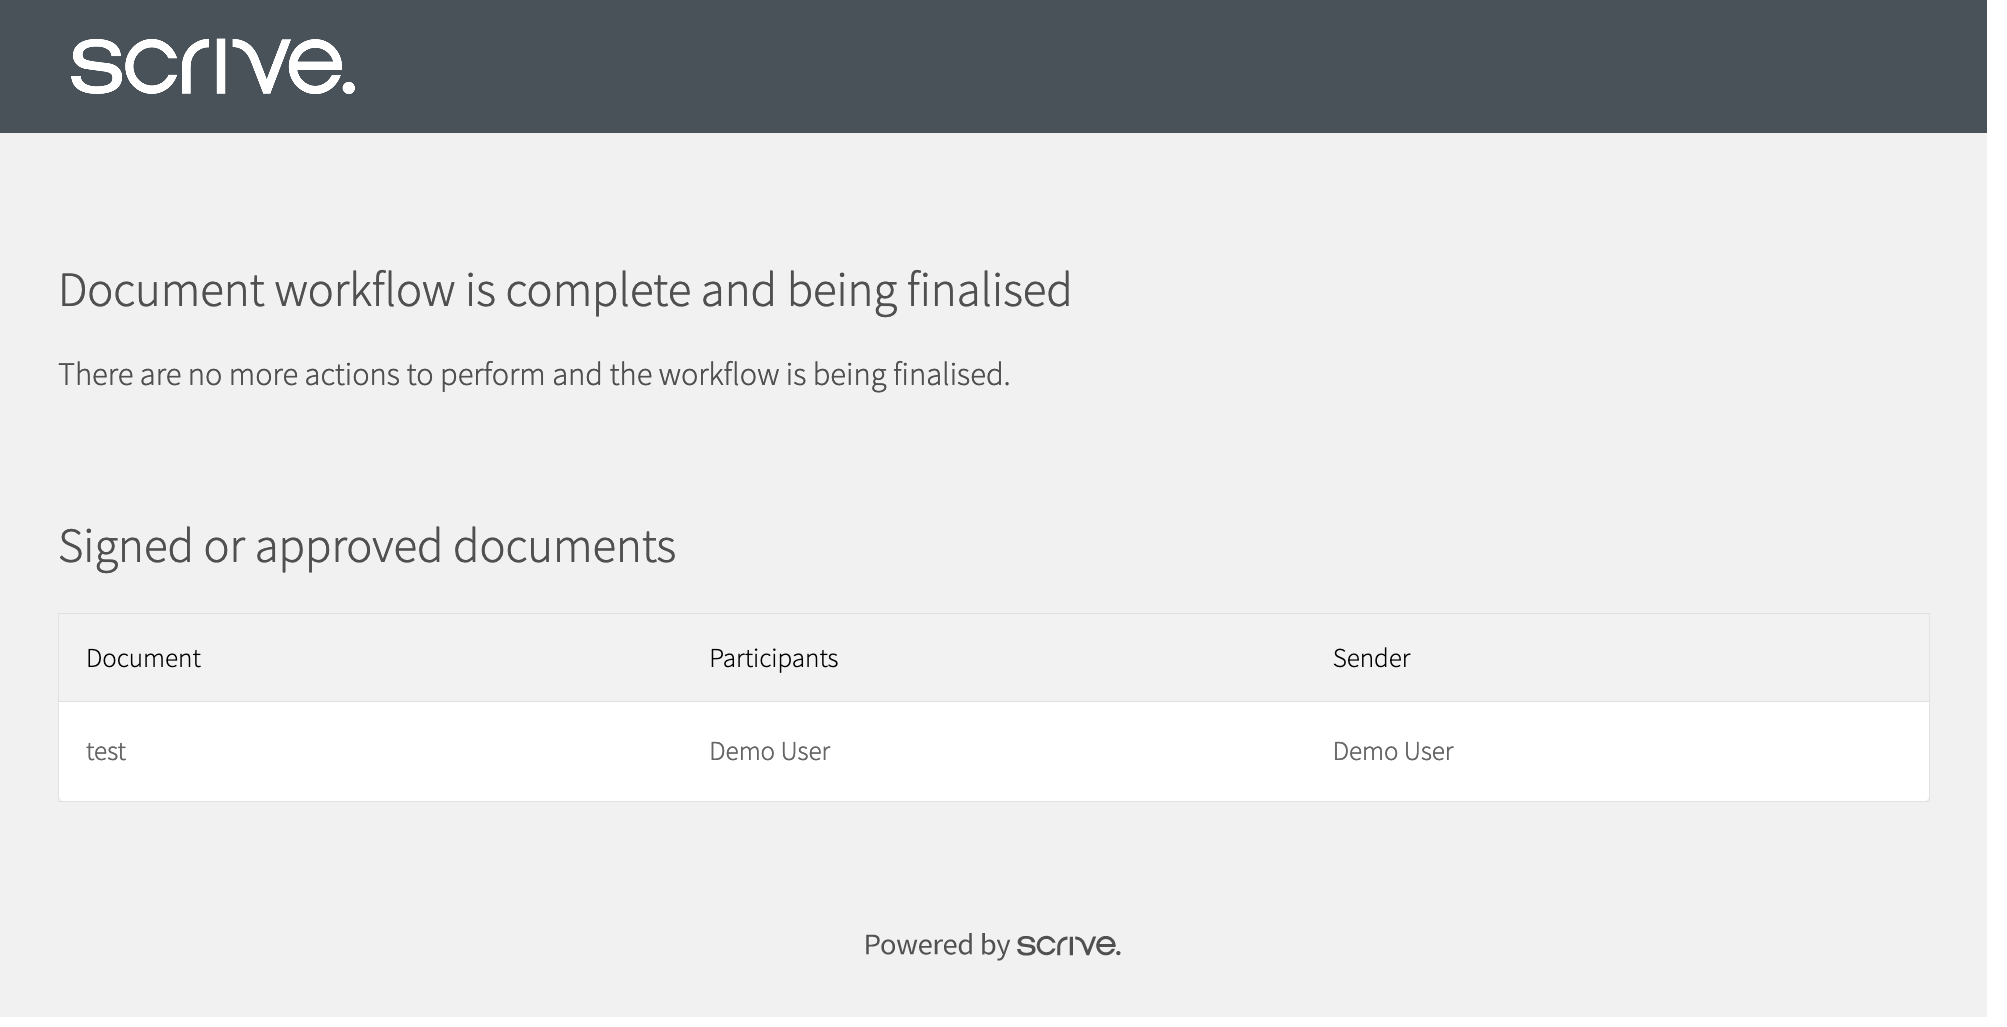
Our job here is done, we can either have another look at the document we've signed or close the tab.
Checking the final instance state
Calling the instance endpoint
For the final time, let's take a look at our instance's status. We can lift our instance_id from the response JSON above:
$ instance_id="e7a59059-af60-4c6e-9920-bf5ecb4345a7"
We now call the instance endpoint using our instance_id:
$ curl -X GET -H "${auth_header}" \
  "https://scrive.com/experimental/flow/instances/${instance_id}"
Successful instance GET response
HTTP/2 200 OK
server: nginx
date: Wed, 22 Mar 2021 15:50:13 GMT
content-type: application/json
strict-transport-security: max-age=31536000

{
  "id": "e7a59059-af60-4c6e-9920-bf5ecb4345a7",
  "title": "Simple Flow",
  "process": {
    "dsl-version": "0.2.0",
    "stages": [
      {
        "initial": {
          "actions": [],
          "expect": {
            "signed-by": {
              "users": [
                "user1"
              ],
              "documents": [
                "doc1"
              ]
            }
          }
        }
      }
    ]
  },
  "process_parameters": {
    "documents": {
      "doc1": "9179748218119364628"
    },
    "users": {
      "user1": {
        "id_type": "email",
        "id": "demo@scrive.com",
        "auth_to_view": null,
        "auth_to_view_archived": null
      }
    },
    "messages": {}
  },
  "state": {
    "available_actions": []
  },
  "access_links": {
    "user1": "https://scrive.com/experimental/flow/overview/258b6c7a-73fb-44bf-bc33-bcf4c515f1eb/user1/1db5747a53d928e6"
  },
  "status": "completed",
  "started": "2021-03-22T14:56:33.699368Z",
  "last_event": "2021-03-22T14:56:33.699368Z",
  "callback": null,
  "author_id": "9206820953483512465",
  "folder_id": "18805"
}
As you can see, the status is now completed, signifying that the instance has no more actions that need to be performed, and has now terminated. You may also see finalising in the status if you do this very soon after signing the document.
This status simply means that there are some automated process that are happening, such as digitally signing and sealing the documents, that need to finish before we can consider the instance completely terminated.
🎉🎉🎉 Congratulations, you've completed your first Scrive Flow e-signing workflow 🎉🎉🎉
Given that most real-life workflows involve multiple documents and participants, our recommended next stop is the processes with many stages and parties How-to Guide.
Further Reading
If you would like a deeper knowledge of the topics covered here, then the following articles may be useful. You are not required to read them in order to understand the rest of this guide.